By nature, I am not a minimalist packer. Growing up, the thought of traveling to Germany for a week and only having one large suitcase was daunting. I’ve been seen stuffing items into my carry-on luggage at the airport ticket counter in order to keep my checked bag under 50 pounds more times than I’d like to admit. So when Neil suggested that we would only have carry-on luggage for our three week trip to Southeast Asia, I nearly melted into a puddle of tears. Shampoo, contact lens solution, sunscreen, bug spray…how was three weeks worth of all my stuff going to fit into one bag and stay under the “hand luggage” weight limits‽ In this post, I offer the tips I used on that trip–and continue to use–to get everything into one bag.
The Backpack
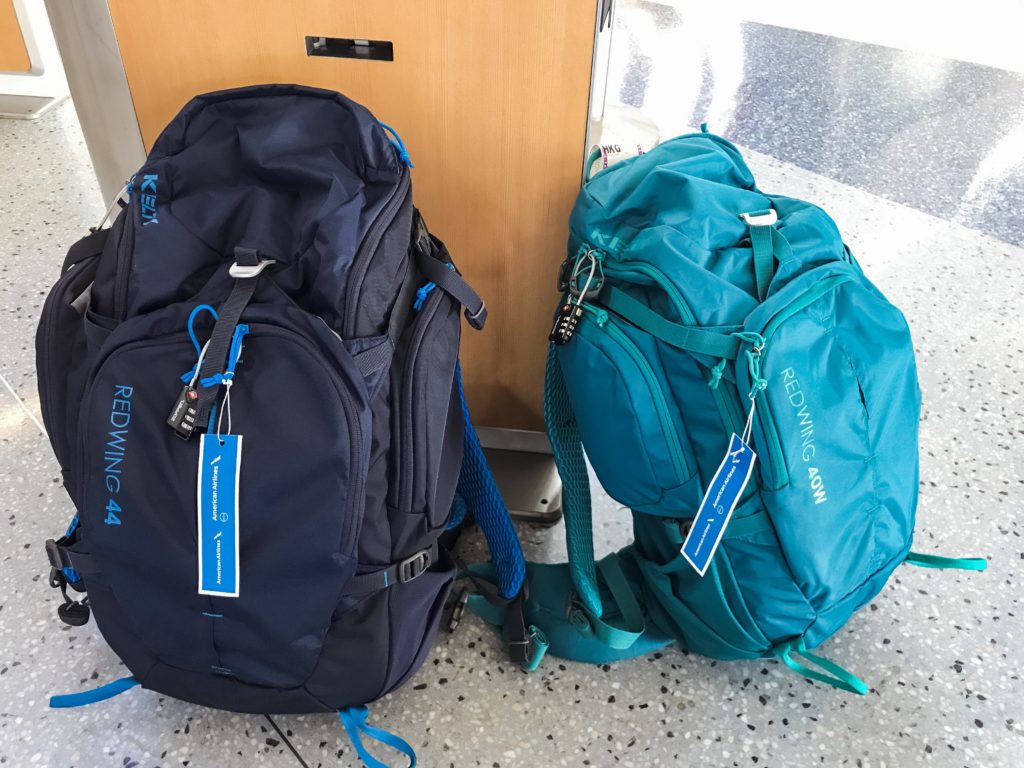
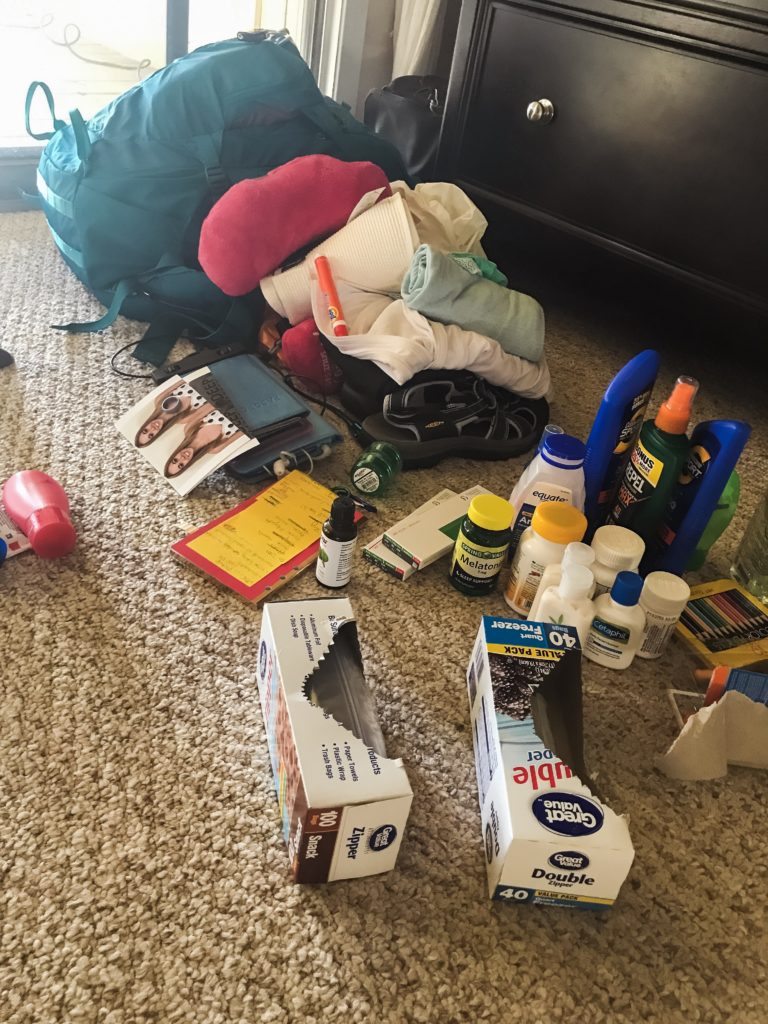
This was the second hardest piece of the packing quandary (I’ll discuss the hardest piece later in the post): we didn’t own backpacks, but had decided it would be a good idea to have them on this trip. Since we were going to be moving through airports to cabs to boats with our luggage, it made sense to have something we could grab easily and keep moving. Also, backpacks come in handy when you might not feel like you’re in the safest environment, like on an overnight train. With just one bag that we could keep a hand or foot on all night, we never felt like our possessions were in jeopardy of disappearing. After some research online and a trip to a store to try on some different bags, we ended up with Kelty Redwing 40 liter (womens) and 44 liter (mens) backpacks. These bags were able to be carried-on for all 10 flights of our trip and they held up well as checked luggage on our long-haul flights. Be sure to invest in some quality TSA approved cable locks for the zippers as well. Neil ended up having to solder metal rings onto the zipper holes so the cable locks could be passed through the rings to keep the zippers locked together, so keep that in mind. I don’t recommend using the nylon pull-loops to secure the lock as these are easy for an opportunistic thief to cut quickly. Also, since we were checking our backpacks for the long (17.5 hours!) flight, we had small, packable daypacks we carried with us into the cabin of the airplane, like these. The daypacks are great once you get to a location and have dropped off the backpack at your hotel accommodations, since you then have a small bag to carry items while you’re out exploring. And, bonus–they pack into themselves for space savings if you don’t want to carry them on the aircraft.
Packing Cubes
Prior to this trip, I had never heard of a packing cube. I was always decent at getting things into my suitcase without much fuss, but this backpack thing was a whole new animal. I researched many blogs and learned that these cubes would make taking things in and out of the backpack much easier. Imagine reaching into a bag and trying to pull out one shirt or sunglasses, with everything for three weeks floating around in there. Not a great plan. Now imagine having 6 small packs within your bag that you can easily fish out and open just one where you know your desired item was located. Sounds much easier, right? Neil found some that looked reasonable on ebags and we got two different color sets to give us the freedom to keep clean and dirty items separate when we could. Many of the larger sizes didn’t fit in our backpacks, but we’ve since used them in our larger suitcases on other trips. Packing clothes into the cubes actually wasn’t too difficult. I had long known that rolling items keeps them less wrinkled, and more compact, so we took that approach. Tuck smaller items like swimwear or socks into shoes or the corners of the packing cubes. Neil opted to take Hurley Phantom hybrid shorts that are both board shorts and walking shorts, so they can be used in the water for swimming or on land for hiking. This was a great weight savings not having to double packing shorts. We used other packing cubes for bathroom items, again trying to keep things as organized as possible within the backpack. I recommend packing cubes for any kind of travel since they just make sense to maintain order inside your larger bags. Here are others that we like but didn’t take on that first trip.
Liquids and Medications: What to Bring and What to Leave
Now, when it comes to the weight of the contents of the bag, most of it seemed to be attributed to the liquids. My hair is colored, so I wanted special shampoo and conditioner for that, along with dry shampoo for the days in between washes. I have very fair skin that burns rather quickly, so I stocked up on sunscreen in SPF-30 and SPF-50, and had some after-sun aloe lotion in case I burned. Most locations around the globe are going to charge a lot for sunscreen, so bring as much as you can initially. We did end up having to buy one additional bottle during the last week of our trip, but thankfully we had brought nearly enough. I happen to be mosquito-bait as well, so I needed sprays and wipes to help eliminate the chance of being bitten. And in the case that I did get bit, I brought spray to calm the reaction afterwards. Items like this I consider non-negotiable; if it’s something that makes you feel better on the odd chance something makes you ill, bring it! We took some activated charcoal capsules, acetaminophen, naproxen sodium, high dose vitamin C, antihistamines, antacids, and bismuth subsalicylate–all in clearly labeled zippered food storage bags to conserve space and weight. If you have any other medication that you take regularly, of course bring that along too. At the time of this trip, I was still wearing contact lenses, so that would have required cleanser solution and saline solution. A few weeks prior to the trip, I made a visit to my eye doctor and mentioned we were about to travel, and she graciously offered daily disposable lenses for me to try. This would mean I could leave the lens cleanser behind, score! I also sprung for a new, slim hard case for my glasses to make sure they would not get squished during any of our travels. Since this first backpack trip, I’ve had LASIK surgery and no longer need need to pack these things to be able to see, and I’m incredibly happy I finally made the decision to do it.
Shoes!
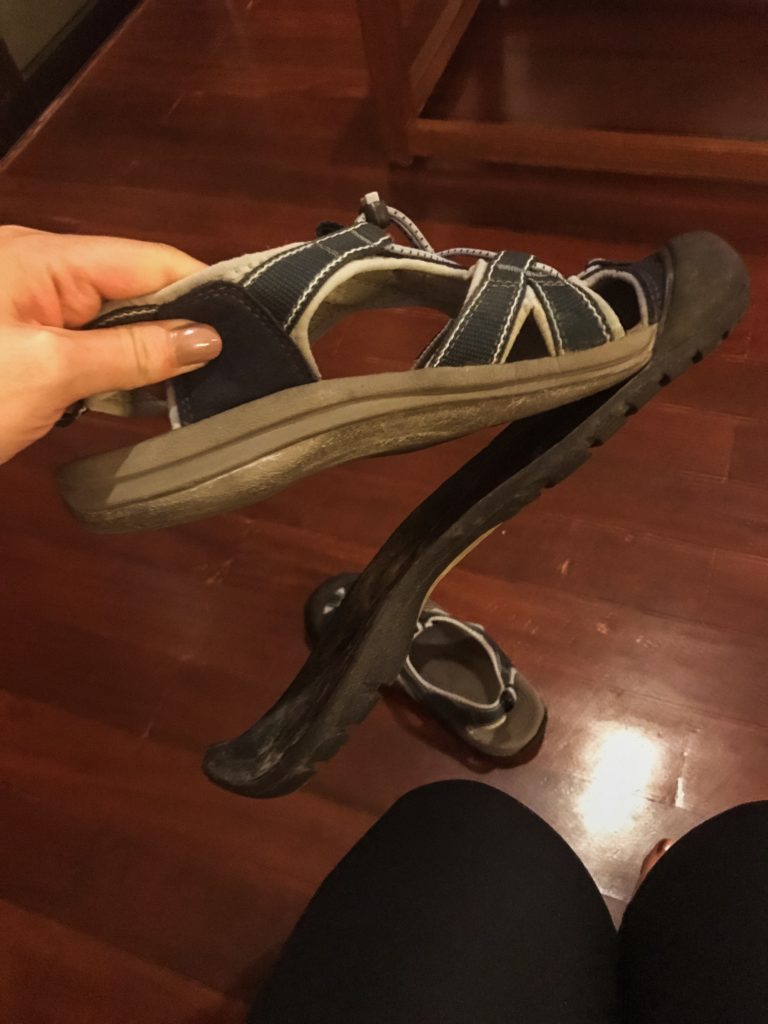
If you’ve known me for more than a few hours, you probably know that I have an affinity for footwear. As mentioned above, the backpack was the second hardest thing to figure out logistically, and that’s because shoes were the toughest for me. When I have any sort of trip to pack for, I usually end up with more shoes than days I am traveling. Yes, I am that person. Since that was far from an option on this trip, I had to really think about where we were going and what was truly necessary. Beaches were going to be frequent occurrences, so flip flops were a given. I have believed that Havaianas are the most comfortable thong flip flops for close to two decades, so a pair of those were a no-brainer. I chose an older pair that I knew were comfortable for long durations of wear. Then, I knew we would be doing some hiking into caves, so I turned to a trusty pair of Keen sandals that I had owned for about ten years. That pair had carried me to Dominica and Puerto Rico and many other places in that time, but sadly, this was their last trip. I have since bought a replacement pair that I anticipate will last me another ten years! The sandals were what I wore on most flights as they were the heaviest of all my footwear. Prior to our Jamaica trip, I had gotten my first pair of slip-on sneakers as part of a deal at a discount shoe retailer. I love stars and this light addition to my luggage provided me something a bit more solid than a flip flop without adding any bulk. Lastly, I wanted something just a bit dressier in the event that we got the chance to do something a bit fancier, so I sprung for a sparkly wedge from Skechers. I wore these for a limited time prior to the trip and ended up regretting that once I wore them for the majority of our first full day in Hong Kong which resulted in me ending up with blisters on the bottom of my feet. This was not my first rodeo with blisters, so I came prepared with bandages in my purse, and then tended to them that evening with sterilized cuticle scissors and alcohol. All of that said, my four pair of shoes served me very well over the 21 day journey, and I only lamented any missing shoes a few times.
Neil ended up bringing a pair of Havaiana flip flops, water shoes, a sturdy athletic shoe (which he wore on most flights since they were his heaviest pair), and a micro suede driving shoe for his dressier option.
Other Helpful Stuff
Just a few other random items that might be of use when traveling internationally with a backpack. One item which I bought for an entirely different purpose is my Flipbelt. As an avid long distance runner, I had stumbled upon this magnificent item somewhere around 2010. I have used this elastic band at amusement parks, several international trips, and of course for running. The original design included 4 slits and one key hook which comes in handy to keep things in place. The belt is flat enough to wear it comfortably underneath your clothes while holding a large phone, lip balm, and even a snack. I put our passports in a zippered plastic bag to keep them dry (from potential rain or sweat!) and then tucked them into the Flipbelt and worn the belt under my shirt while walking through the streets of Bangkok and riding the MTR in Hong Kong. I recommend investing in one of these as it will be money well-spent. I’m still using the very first one I ever bought! The other item that I’d recommend looking into is a small dry bag. These waterproof sacks are great to have to stash your passports in if it starts raining suddenly, keep snacks and your phones in if you’re on a boat, or just to keep things free from sweat in a warm location. The bag also doubles as a bit of a “small clutch” when you want to keep your goods near you and dry without wearing a Flipbelt. On our trip to Turks & Caicos I ended up using a small dry bag as my purse since it was easy to clip on my wrist and not worry about misplacing it or getting sand in it. The last general tip I’ll provide here is to get on a scale with your fully packed backpack at least a few days before your actual departure date. Why, you ask? I can nearly guarantee you that it will weigh more than you think on that first try. I was aiming for 15 pounds to comply with international carrier carry-on limits…and my backpack probably started at closer to 25 pounds. Give yourself those few days to figure out what you can part with and buy as you go since, in all reality, you can’t bring every little thing you’d want to for 3 weeks in just 1 bag!

I hope that this post gives you some insight to assist you in packing pack for several weeks in one backpack. As these were all learnings from our first trip with the backpacks, I anticipate we will have some more hints to add after each trip we take our trusted backpacks.